Friday, December 7, 2012

How to Fix a ColecoVision Gaming Unit That Shows Weird Picture

by Kelly

We interrupt our regularly scheduled crafty post to bring you a special feature - old school video game repair.

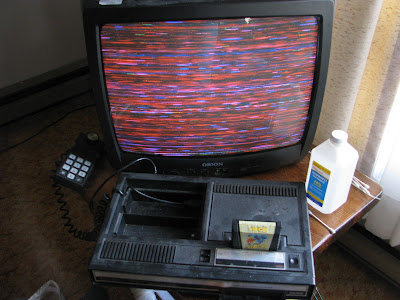
Santa came to our house early and brought us the ColecoVision gaming system that my husband wanted when he was a kid. Only 29 years late, but hey, you can't have everything. Including, it seems, a working game system.

No Cartridge

With Cartridge

We tried to clean it (that's what the giant sized bottle of rubbing alcohol on the table is all about) to no avail. Luckily, through the magic of the Internet, the solution was less than a minute away.

We landed on Joomla!, which I had never heard of before, but it's a great site for those with a love of archaic game systems. And there was our solution - an easy, in depth tutorial, with pictures. Cheers, Callan, our faceless Internet adviser, and thanks for the help!

All you have to is change the power switch. Get out your solder braid or your handy dandy vacuum pump solder sucking system, if you have one. Ah, how I miss the high-tech soldering stations that I had access to at school.


Switch removed

You can repair the switch itself, if you're a traditionalist, but that requires disassembling the switch, cleaning the contacts, applying new dielectric grease, and reassembling said switch. Frankly, that seemed like a huge pain in the a**, so we chose to install a new switch.


Once you've done this minor repair, you can do the happy dance, when your system works like new:


So if you're in a similar situation with your ColecoVision, just visit Joomla!'s tutorial and in no time you'll be up and running. One tip on taking apart the ColecoVision: there are three case screws under the silver label on the front of the unit. If you're a patient person, and lucky, you should be able to peel up that label and reapply it with no problems. Don't take it all the way off, just lift each end until you find the screws, then stick it back down.

Sorry to go off topic, but I just had to share, and never fear, our next post will be about crafting. Or backyard birding. Or books. Probably.

Monday, December 3, 2012

The Sweater Project

by Kelly


The sweater project begins:


This is a project from the kit I Taught Myself Knitting, produced by Boye. Some people slam this kit because of the 'outdated' patterns, or because they found it difficult to learn from, or because the materials weren't adequate.  I personally would give this book 4 stars, and think it's a great resource for beginning knitters, provided you have access to YouTube. 

I freely confess that I learned how to knit by watching YouTube videos. It's cheaper than classes, easier than trying to decipher diagrams or drawings in a book, and you can consult YouTube in the middle of the night when a project has gone awry and you need a helping hand.

The Boye kit does provide great guidance in 'what's next'. It walks you through the process of learning to knit, and the projects in the book detail exactly what you need to know, with page numbers of the lessons.  For example, for the sweater I'm working on, I need to know lessons 1,2,3,4,7,8, 10, 14, and 16. In other words, I should be able to knit, purl, increase and decrease, knit to gauge, join yarn, and seam. If I can't, I probably shouldn't tackle this project yet.

Since I have never knit a sweater before, I needed a simple pattern that has been tested. I decided I would rather not learn from an online pattern that might be full of errors and typos, and would only confuse me further. I'm sure that I'll be plenty confused as is. And the Ravelry page (I heart you, Ravelry) doesn't have any errata for this pattern, so I'm hopeful that at least I'll be working from good instructions.

I can already say, though, after knitting three gauge swatches, that I don't think much of this Bernat yarn. It doesn't seem to wear very well in the washer, though it's advertised as 'machine washable'. I might end up hand washing this sweater, and it would have been nice to know this ahead of time. Still, we'll see what the finished product looks like.

Stay tuned for the next week or so, to see how it goes.
Related Posts Plugin for WordPress, Blogger...