Showing posts with label knitting. Show all posts

Friday, March 1, 2013

Preparing for Sweater Seaming!

by Kelly


Things to do when it snows like crazy and you have the adult version of a 'snow day':

1. Mop the floor. This is actually not something I'd recommend, but this seems to be my usual habit. At least the mop is handy for cleaning up tracked in snow.

2. Vacuum the floor with a Roomba. Especially entertaining if you have a staircase.

3. Fix a cat's scratching post.


This project I started myself, but my husband had to finish it. I just didn't have the oomph to pull that sisal rope tight. By the way, my husband says that make sure you have enough rope - I bought 100 feet of 1/4 inch sisal and that wasn't quite enough. A better amount for a two foot scratching post would be 125 feet.

4. Wash and block a sweater and prepare the pieces for seaming.


5. Research how to seam a raglan sweater and discover your first mistake before you even make it. The pattern instructions weren't clear, and I was going to start by seaming the sides. Luckily I went online and found out that seaming starts at the raglan shoulders. Whew! One mistake averted.

6. Optional : Cuddle on the couch with a husband and cat and watch the snow falling outside. Happiness.

Friday, February 22, 2013

Sleeve II

by Kelly


So much for spring....just about a week after I saw my first robin, we get snow and freezing temps. Then again, that pretty much is how spring works in Illinois, so let's not get discouraged.

In the meantime, I've cast on for the second sleeve of my sweater project.


It may even be done before summer!

Monday, February 18, 2013

Sleeve

by Kelly


One sleeve, half complete:


Still so much work to do. But it does look fairly sleeve like, doesn't it?

Monday, January 28, 2013

Raglan Sweater Weirdness

by Kelly


Still working on the Bernat Denimstyle Turtleneck Sweater. I was merrily following the directions when I reached a weird part - at least it was weird to me:


This is the front panel, and when finished it has two points on either side and an unworked part in the middle. That thing in the middle is a stitch holder (imagine a big green safety pin) that is holding the unworked stitches.

I looked at this completed panel and instantly was plagued with doubt. How could this be right? But apparently it is...for raglans.


via Knitting and  Crochet Guild


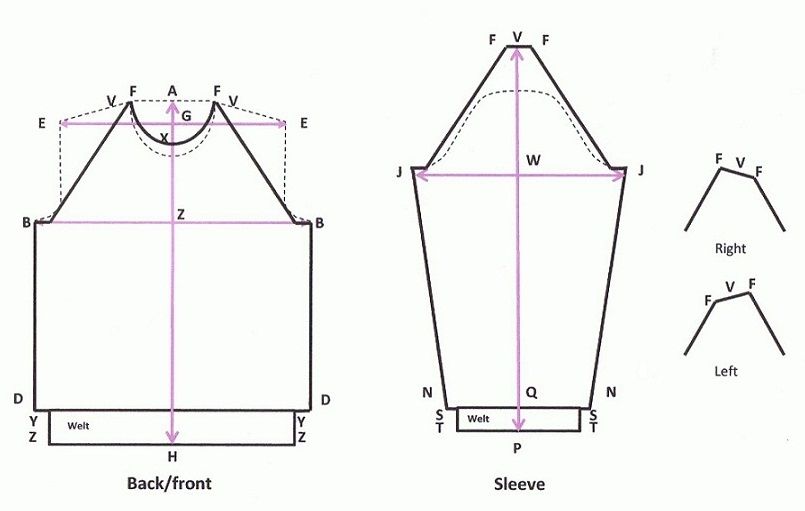
Thank heaven for the Internet! The link above goes to a site I have never seen before which looks to be a fantastic resource for all things crochet and knit. Even better, the page I landed on had two diagrams, one of which showed how to piece a Raglan sweater together. Whew!

There's also a wonderful article on Knitty.com that explains way more about sweater construction than I ever really wanted to know, but it cleared up a few mysteries, and more importantly, reassured me that I was on the right track here.

I've added Knitting and Crochet Guild to the sidebar under 'helpful sites' and look forward to exploring there sometime. Meanwhile, on with the sweater. Sleeves are next - and as a side project, maybe another pair of leg warmers for my aunt-in-law, while the cold weather lasts.

Monday, December 3, 2012

The Sweater Project

by Kelly


The sweater project begins:


This is a project from the kit I Taught Myself Knitting, produced by Boye. Some people slam this kit because of the 'outdated' patterns, or because they found it difficult to learn from, or because the materials weren't adequate.  I personally would give this book 4 stars, and think it's a great resource for beginning knitters, provided you have access to YouTube. 

I freely confess that I learned how to knit by watching YouTube videos. It's cheaper than classes, easier than trying to decipher diagrams or drawings in a book, and you can consult YouTube in the middle of the night when a project has gone awry and you need a helping hand.

The Boye kit does provide great guidance in 'what's next'. It walks you through the process of learning to knit, and the projects in the book detail exactly what you need to know, with page numbers of the lessons.  For example, for the sweater I'm working on, I need to know lessons 1,2,3,4,7,8, 10, 14, and 16. In other words, I should be able to knit, purl, increase and decrease, knit to gauge, join yarn, and seam. If I can't, I probably shouldn't tackle this project yet.

Since I have never knit a sweater before, I needed a simple pattern that has been tested. I decided I would rather not learn from an online pattern that might be full of errors and typos, and would only confuse me further. I'm sure that I'll be plenty confused as is. And the Ravelry page (I heart you, Ravelry) doesn't have any errata for this pattern, so I'm hopeful that at least I'll be working from good instructions.

I can already say, though, after knitting three gauge swatches, that I don't think much of this Bernat yarn. It doesn't seem to wear very well in the washer, though it's advertised as 'machine washable'. I might end up hand washing this sweater, and it would have been nice to know this ahead of time. Still, we'll see what the finished product looks like.

Stay tuned for the next week or so, to see how it goes.

Friday, November 16, 2012

Candy Dot Hat and Scarf

by Kelly

Now finished: the Candy Dot Hat and Scarf Set.


And the hat came out just a smidge smaller than I calculated, and by a smidge I mean less than 1/8 of an inch, so I'm really happy about that. I am now a Gauge Master! Ha, not really. But I'm making progress.

I'm going to try a few more pairs of gloves and then plunge into the sweater project. 


Monday, October 29, 2012

Cool Weather

by Kelly

After all the searing heat of summer, it's a little shocking how cool it is here now. So cool, in fact, that a picturesque picnic is out of the question.


But now that the leaves are off the trees, it is easier to see the sunrise:


Oh, and if you're curious to know about the hat from the Friday post, well, it went so well (except being a bit too big, since I made a mistake in my gauge calculations) that I made another one.


And by the way, if you're ever short of a model for your hats, and have no round fruits or vegetables or willing pets to put them on, try stuffing them with plastic grocery bags.


The pattern is, of course, a free one, which I found at AllFreeKnitting.

I'm now casting on for a pair of matching gloves for the smaller hat. Yes, gloves, not mittens. I've calculated gauge and altered all the numbers, and I've read the pattern over to make sure I understand what has to happen. It seems simple enough...

Friday, October 26, 2012

Pinks

by Kelly


One set complete! One pair of mittens and one headband/earwarmer, sized for kids 6-12.  The mittens are from the book Patons Next Step Seven.

The headband is from DROPS design and is also available as a free pattern, either on Raverly or here. I adapted it slightly to fit a smaller head by dropping the last increase. And while I was looking for a page to link to, I found this page of other DROPS designs for headbands, so I can make more in different styles. I think these would be a great alternative to winter hats, especially for girls with long hair or ornate hair styles.

I love the fact that I can learn new things and at the same time help others stay warm this winter. I feel much better about knitting lots of colourful mittens if I'm not just tossing them in a bin to store in my closet. And speaking of learning new things, I'm working on an interesting hat project:


The idea here is that you knit it flat and then fold it into a hat shape and seam it up. I have my doubts, but the end result is so cute that I have to give it a try. Stay tuned for the results.

Now if only I could find a way to knit with all these beautiful autumn leaves that are lying all over the place. That would be recycling that I could get excited about.


Monday, October 22, 2012

Mittens on Three Needles

by Kelly

Come for a walk through the autumn landscape with me:


Meanwhile, I'm knitting mittens in the round this time. Yay, no seaming! Of course, this type of knitting does come with other challenges. For example, the thumb is knitted last. Which makes me wonder about gloves. If you have to knit each finger individually, no wonder fingerless gloves are so popular.


But I will persevere. I definitely aim to achieve gloves this year, because I remember refusing to wear mittens after a certain age and I want to knit something that older kids will be happy to wear.

After all, cold weather is coming, and everyone deserves warm hands. 


Friday, October 5, 2012

Patons Next Steps Seven

by Kelly

Time to push the envelope again...this time the challenge is mittens.


Sorry for the poor lighting in that picture - it's awfully early here, because kitty has to go to the vet today and I won't be home at my normal posting time.

At any rate. last time I made mittens, there was a hole near the thumb that I couldn't close up to my satisfaction. So when I was buying the Mary Maxim Kimono kit for my aunt, I also got the book above, Paton's Next Steps Seven, firstly because I needed to bump my total purchase over $35 to get free shipping, and secondly because I wanted to be able to knit mittens and gloves, darn it.

This book is really amazing - it walks the beginner knitter through many styles of mittens and gloves, on two needles, double pointed needles, and circular, and all in only 98 pages.


So I'm past the thumb and starting the main body of the mitten. Can't wait for the seaming ahead! So far, though, it's been quite fun.

And now I'm really interested in the other Paton's Next Step books. They have quite a variety. including a whole series of crochet books. My next step will probably be this one on cardigans. I have quite a selection of gray hoodies, but only one cardigan, which I never wear because the zipper doesn't work and replacing a zipper is way out of my comfort zone. But if I make my own cardigan, rest assured, no zippers will be involved. Of course, there may be buttons,and that means knitted button holes, which are also out of my comfort zone. (*Sigh*)

And by the way, that picture above reminds me of a television interview I saw with a magazine model, who related some of the strange instructions that were written into her scripts, which included 'laughing at fruit'. Google that phrase and you'll see what I mean. Modelling seems to be a very odd business.

Friday, September 28, 2012

Braided Flag Scarves

by Kelly

Autumn is officially here, and the trees are beginning to put on their annual fall finery:


And of course, you know what that means for us? That's right...it's time to start churning out hats, scarves and mittens for The Mitten Tree, a local charity that provides for less fortunate kids.

I have sort of a head start, at least as far as the scarves go:


That's a French scarf, an Irish scarf, and an Italian scarf. I'd make an American scarf, except I'm struggling with a way to make stars on the blue. I considered making appliques, but on further thought I think there might be an easier way. I have to experiment a little, though.

I'm also going to give mittens and gloves another try this year. With a different pattern this time, one that explains how to avoid making a hole by the thumb.

I love all seasons equally, but fall and winter have added benefits now that I can crochet and knit. So many possibilities! And I'm going yarn shopping on Saturday with Dawn and Donna. I think we'll have a fantastic time hanging out together in a yarn store, especially since one of them once purchased a whole shopping cart of yarn, while the other one has a $50.00 gift certificate, so even if I don't buy a thing, I can live vicariously through the purchases of others.

My husband said that the idea sounded a little dangerous to him, but I just pointed out that it could be worse - I could be going shopping for books, after all. He thought about it for a minute, then agreed that yarn shopping didn't sound so bad after all.

Friday, September 21, 2012

Knitting Books

by Kelly


Books! One that I purchased at near cover price (gasp) and 2 others from a library sale.


Yes, I'm getting overconfident again. I'm dreaming of a lovely, warm, knit sweater that won't break the budget because I made it myself.

But I do know my limitations, and I can see at a glance that Viking Patterns for Knitting and The Celtic Collection are out of my league. Ah, but look at the eye candy inside:

The Celtic Collection

The Celtic Collection


Viking Patterns for Knitting

Viking Patterns for Knitting

Meanwhile, the Debbie Bliss book has patterns that are still beautiful, and might actually be attainable one day:

Celtic Knits


Celtic Knits
I love, love that dark blue sweater above. And once I get past the basics of sweater construction, that's the first one I'll tackle.

Meanwhile, it's time to go to the closet and break out the simple sweater project that has been reproachfully falling on my head lately, and calculate what I will have to do to make the gauge. (*sigh*) Where did I put that calculator?

Friday, September 7, 2012

Mary Maxim Aran Kimono Kit Review

by Kelly

The project for my aunt is done!


I tossed the finished product in the washer and tumble dried it for ten minutes and it is now wonderfully soft. And warm. Too warm to try on for even a few minutes in this ninety degree weather.

All in all, I was pretty pleased with this kit. The project was really fast to put together, even for an inexperienced knitter like me - it took less than two weeks. And the blend of knitting and crochet meant that it was never boring to work on. The acrylic yarn itself has varying thickness, so it self tweeds, without being either scraggly or too thick to work. And the little fluffs of dark gray add great texture and color.

There was also more than enough yarn to compete the project. I actually had a bit left over. Maybe my fabric should have been tighter?


My one quibble with the kit was the lack of guidance where seaming was concerned. I used mattress stitch on the vertical seam, and single crochet for the side seams. It actually worked out really well - it gives the garment a little more structure, while blending in perfectly with the edging.


At the same time, from the front or back, it's almost invisible:


Here's one last picture, posed artistically, as though I were putting it in the shop for sale:


I do love the colors and texture of that Aran Tweed yarn. I might have to get some for myself. It would make an awesome, soft and washable sweater. And with this latest success, I'm almost feeling brave enough to tackle the sweater project that has been languishing in a box since last winter. Almost.

Meanwhile, I had two gauge swatches that I had no use for - but then I got creative, so I took one of them apart and found another use for that yarn.


All together now....Awww! This little guy is going in the bag with the kimono. I hope my aunt gives him a good home.

Monday, September 3, 2012

Seaming the Mary Maxim Aran Tweed Kimono

by Kelly

Work proceeds on the Mary Maxim Kimono project. Now that all the pieces of the garment have been made, there is one more hurdle for an inexperienced knitter like me - seaming the thing together.

Seaming isn't my first love. There are any number of things I would rather do, including visiting the dentist and itemizing my taxes. Sadly, it wasn't the season for either of those chores, so I didn't have an excuse to put the project aside.

Warning: Although there isn't any flash photography in the pictures ahead, there is some potentially eye-searing orange shag carpeting. You may wish to change the color setting on your monitor, but then again you might not, because those settings will never go back to normal despite hours and even days of fiddling. Trust me on this one. A better solution might be to put on a pair of dark sunglasses. Ignore anyone who laughs at you for surfing the net with cool shades on.

Here's the garment all laid out on the floor, ready for the next step:


There are all kinds of ways to seam knitting together. The most invisible is mattress stitch, which is used to join two vertical rows together:


Mattress stitch takes a little work to get the hang of, but it's well worth all the effort. It's very gratifying to pull the seaming thread tight and watch the stitches zip themselves together.

But then I hit a snag - I had to seam two horizontal rows together. See how the little v's of the knitting are lying on their sides in exhaustion, rather than standing up straight? That's the first clue that trouble lies ahead:


The Mary Maxim pattern didn't offer any suggestions here, because they were trying to cram the whole pattern onto one sheet of paper, and there was no room for extraneous material...except for those images of basic crochet stitches, that is. Left on my own hook, I did what I always do, and turned to the Internet for help.

I found a simple tutorial on shoulder seaming at TLC knitting, so I tried that first. I wasn't happy, though, because it left a little runnel or valley in the finished side. So I took that out and tried a slip stitch crochet edge, which also didn't work out. Eventually I settled on a 'single crochet' seam, and I'm reasonably happy with how it looks. It blends in well with the crochet edging that  is going on the edges of the garment, and as a bonus provides nice folding lines.


I did a little more research, though, and found what I think might be a better solution for anyone else who might be working on this kit  - backstitch seaming. There's a good tutorial with tips at Dummies.com. I have already started the edging and don't feel like frogging it at this point, otherwise I would give this kind of seam a try.

Now, all of this might seem (pun intended) really obvious to more experienced knitters, but I personally would have appreciated a little more guidance in the written instructions than "seam the edges neatly together". And speaking of guidance, for a wonderful page devoted completely to seaming knits, check out VogueKnitting. This link is definitely going into my bookmarks folder.

I'm off to finish the crochet edging to the kimono. Yay! Nearly done!

Monday, August 27, 2012

"Beautiful Lace" Translated from Fancy Work Recreations

by Kelly

Check out this little bit of lace that I knit from a pattern in an old ebook titled Fancy Work Recreations. The name of the pattern is 'Beautiful Lace'.


Of course, this is supposed to be knitted as actual lace, using "No. 50-70 linen thread and No. 18 steel needles." But I thought that trying out a vintage pattern that uses old abbreviations, with no picture for guidance, and doing this for the first time with tiny thread and needles, would be just asking for trouble. Especially lace. Grrr...I'm feeling tense just thinking about it. So I used what I had on hand, which was worsted weight yarn and size 8 (US) needles. It's still very pretty, isn't it?

If you're curious to see what else the book holds, check out this link to the book on the Internet Archive. Look over to the top  left of the page you land on, and you'll see a 'read online' link. And don't worry, the book's not just for knitters - there are many beautiful crochet lace patterns too.

And since I had to translate the old fashioned abbreviations used in the pattern, I thought I would save someone else a little trouble, and post a more modern version here. I won't even attempt to match the original gauge - this will only be the written instructions.

I've done the best I could to troubleshoot the pattern, but if you find any typos or mistakes, please let us know in the comments.

The increases and decreases are sometimes staggered, so don't worry if they don't follow each other immediately. But a quick way to check, if you think you've made a mistake, is to count the stitches when you've finished a row - the total should always be 28.

Beautiful Lace

CO 28 stitches and knit across

1. Sl1, k2, (yo, k2tog)twice, yo, k1, yo, k2, k2tog, k4, k2tog, k2, (yo, k2tog) three times, k2

2. Purl this and all even rows

3. Sl1, k2, (yo, k2tog)twice, yo, k3, yo, k2, k2tog, k2, k2tog, k2, (yo, k2tog) three times, k2

5. Sl1, k2, (yo, k2tog)twice, yo, k5, yo, k2, k2tog, k2tog, k2, (yo, k2tog)three times, k2

7. Sl1, k2tog, k1, (yo, k2tog)twice, yo, k2, k2tog, k4, k2tog, k2, yo, k1, (yo, k2tog)twice, yo, k3

9. Sl1, k2tog, k1, (yo, k2tog)twice, yo, k2, k2tog, k4, k2tog, k2, yo, k1, (yo, k2tog)twice, yo, k3

11. Sl1, k2tog, k1, (yo, k2tog)twice, yo, k2, k2tog, k2tog, k2, yo, k5, (yo, k2tog)twice, yo, k3

12. Don't forget to purl the last row!

repeat above 11 rows for pattern.


Friday, August 24, 2012

Show and Tell

by Kelly

It's show and tell time again! Lately, I've been crafting for cooler weather.


I think I'll call the first one a 'Bring Back the '80's' scarf. The second one is  a ruffle scarf made with Lion Brand Homespun. The homespun scarf is sooooo soft, it'll be hard to let it go.

And I'm also working on the project for my aunt, which I mentioned before. This one is really a great stepping stone for me. It's just three panels of stockinette seamed together, with a crochet border. How simple, right?


The only challenge here is that I had to make a gauge swatch...tons of fun, since I failed at that before. But I have learned things since then, and seem to have been more successful this time around. At least, the piece of the garment that is on my needles at the moment is coming in at 19", which is what it's supposed to be.


Fingers crossed...
Related Posts Plugin for WordPress, Blogger...