Friday, September 21, 2012

Knitting Books

by Kelly


Books! One that I purchased at near cover price (gasp) and 2 others from a library sale.


Yes, I'm getting overconfident again. I'm dreaming of a lovely, warm, knit sweater that won't break the budget because I made it myself.

But I do know my limitations, and I can see at a glance that Viking Patterns for Knitting and The Celtic Collection are out of my league. Ah, but look at the eye candy inside:

The Celtic Collection

The Celtic Collection


Viking Patterns for Knitting

Viking Patterns for Knitting

Meanwhile, the Debbie Bliss book has patterns that are still beautiful, and might actually be attainable one day:

Celtic Knits


Celtic Knits
I love, love that dark blue sweater above. And once I get past the basics of sweater construction, that's the first one I'll tackle.

Meanwhile, it's time to go to the closet and break out the simple sweater project that has been reproachfully falling on my head lately, and calculate what I will have to do to make the gauge. (*sigh*) Where did I put that calculator?

Wednesday, September 19, 2012

Chicken Scratch Skull and Crossbones for Talk Like a Pirate Day

by Kelly


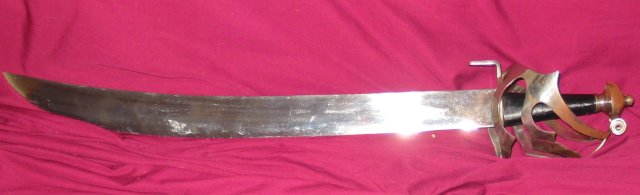
Arrr...so, me mateys, today be Talk Like a Pirate Day. Landlubber that I be, this one would have slipped right by, but I be married to a pirate, you see...and we have the cutlass to prove it.

via Wikipedia

No, not THAT kind of cutlass! THIS kind of cutlass...


But this be a crafty blog, and the prize we seek is always handmade. So behold, all you scurvy dogs...and cats, if there are any...a bit of craftiness for this special day :


A Chicken Scratch skull and crossbones? Aye, that's right! It was either that or sing the 'yo ho, yo ho' song again...or show you a few things I learned from The Captain (*picks up cutlass*).

Aye...that's what I thought! You're welcome.

Monday, September 17, 2012

Local Wildlife

by Kelly

I thought I'd post some pictures of the local wildlife, since it's fall, after all, and some of them will be leaving for the winter.

I've been putting out peanuts on the back patio for a few weeks now, and I have attracted a whole gang of these guys:

Tufted Titmouse

I was originally hoping to lure in a few of the thousand and one squirrels that live around here, but they're too busy to be bothered. But that's okay, I got a photo anyway.


I also cleaned and filled a hummmingbird feeder this morning and look who came by for an afternoon snack.

Ruby-throated hummingbird?

This feeder has been out of order all summer, so I didn't expect any results at all, let alone such a quick response. I queried the mighty Google and am guessing that this is a Ruby Throated female, but I am far from a hummingbird expert.

Oh, and here's one more native creature, that I caught on the fly:


That's an Assisi work deer that I made. And how did I do multi-color Assisi embroidery? I'm afraid that's a trade secret :)

I got the inspiration for this from my FIL, who saw a white deer in our shared backyard a few years ago. I wanted to make an embroidered deer running against an autumn background, but I couldn't find any patterns that I liked. So rather than design my own, which was way too much trouble, I decided to try Assisi embroidery, because that's just one color of floss used to outline an image. Of course, then I got bored with working just one color and anyway the deep autumn red that I chose really started to bug me, since I thought it was too purple, so I came up with a new technique instead.

The funny thing is, my FIL is a hunter, so naturally when he told me about the deer I asked if he was going to get out his bow and try for it. He looked at me as if I were crazy, and said, "You don't kill a white deer."

Oh.

So you'd think that, over time, if everyone felt this way, the white deer would become extremely common, since they were the only ones who had a truce with the hunters. Strangely, they're still really rare. Must be some genetic thing.

This particular white deer is listed in our shop. It's going to be really rare too, because I don't think I'll take all that trouble again. Next time, I'll just get out the graph paper.

Wednesday, September 12, 2012

Then and Now by Donna


It is canning season in the midwest and I am busily canning salsa, pasta sauce, and stewed tomatoes.  This is a picture of my work from last year since my camera isn't working and I keep forgetting to get it fixed.  Canning can be exhausting work even if you have everything close at hand and all the right utensils.  I use a hot water bath canner like the one in the picture.

I was born in the 1940's and started helping my mother can in the early 1950's.  We did not have running water in our house so we carried pails of water from a well using a pump like the one below.  Using that pump was definitely good exercise for the arms. 


That is a lot of pails of water when you are canning.  We did not have a gas range.  We had a stove that burned coal and wood like the one in the picture.  I learned how to cook and bake on a stove like that.

We did all the cooking of the things we were going to can on this stove, put everything in jars and then took the jars outside.  My mother did not have a canner like I have.  We had three concrete blocks with a washtub like the one in the picture on the blocks.  We filled the tub with water and built a fire under the tub and put the jars in it.  You got the fire hot enough to boil the water and then left the jars in it for whatever time was necessary. 

While I was searching for these pictures I found a couple of survivalist sites where they describe canning this same way now.

I can just a few things although it ends up being quite a few jars.  My mother canned everything she could get her hands on.  We had a garden, we went to orchards and picked apples, peaches and pears, we picked blackberries.  My sisters and I shared a bedroom that was just off the kitchen and half of one wall was shelves where all the canned food was stored.  All this work was necessary if we were going to eat all winter.  Its no wonder my mom was always tired.  I definitely prefer canning now to back then.

Monday, September 10, 2012

Oh, Snap! Eyes for Amigurumi

by Kelly

Snaps make pretty good eyes for amigurumi :


I ran out of black embroidery thread, so I couldn't sew eyes for this one. I tried button eyes, but that gave the bear what I think of as 'creepy doll syndrome', so I cut them off. It was while I was putting the buttons back in the jar that I ran across a snap and thought I'd give it a try. Of course then I had to pour all those buttons out onto the table again and try to find another matching snap for the other eye, because these are buttons after all, and organizing my collection of loose buttons has never been high on my priority list.

I was surprised that the jar contained so many snaps. I inherited this jar from my mom when I moved out into my very first apartment. I guess she thought that I would do my own sewing after I was out on my own, but, ha, that wasn't what happened after all. In fact, I still have never sewed a snap on anything (until now, that is) although I have replaced the occasional button. I never realized that snaps came in so many different varieties - I guess they're almost like heirloom tomatoes.

Oh, and the bear is available in the shop  if you would like to adopt him. There will be a small rehoming charge, of course.

Also, that funky, old fashioned yarn that the bear is made with came from my aunt's partial de-stashing. Here's a picture of what she gave me:


So what do you call it when you are gifted with someone's de-stash? Is there a word for that? Re-stash, maybe?

Friday, September 7, 2012

Mary Maxim Aran Kimono Kit Review

by Kelly

The project for my aunt is done!


I tossed the finished product in the washer and tumble dried it for ten minutes and it is now wonderfully soft. And warm. Too warm to try on for even a few minutes in this ninety degree weather.

All in all, I was pretty pleased with this kit. The project was really fast to put together, even for an inexperienced knitter like me - it took less than two weeks. And the blend of knitting and crochet meant that it was never boring to work on. The acrylic yarn itself has varying thickness, so it self tweeds, without being either scraggly or too thick to work. And the little fluffs of dark gray add great texture and color.

There was also more than enough yarn to compete the project. I actually had a bit left over. Maybe my fabric should have been tighter?


My one quibble with the kit was the lack of guidance where seaming was concerned. I used mattress stitch on the vertical seam, and single crochet for the side seams. It actually worked out really well - it gives the garment a little more structure, while blending in perfectly with the edging.


At the same time, from the front or back, it's almost invisible:


Here's one last picture, posed artistically, as though I were putting it in the shop for sale:


I do love the colors and texture of that Aran Tweed yarn. I might have to get some for myself. It would make an awesome, soft and washable sweater. And with this latest success, I'm almost feeling brave enough to tackle the sweater project that has been languishing in a box since last winter. Almost.

Meanwhile, I had two gauge swatches that I had no use for - but then I got creative, so I took one of them apart and found another use for that yarn.


All together now....Awww! This little guy is going in the bag with the kimono. I hope my aunt gives him a good home.

Monday, September 3, 2012

Seaming the Mary Maxim Aran Tweed Kimono

by Kelly

Work proceeds on the Mary Maxim Kimono project. Now that all the pieces of the garment have been made, there is one more hurdle for an inexperienced knitter like me - seaming the thing together.

Seaming isn't my first love. There are any number of things I would rather do, including visiting the dentist and itemizing my taxes. Sadly, it wasn't the season for either of those chores, so I didn't have an excuse to put the project aside.

Warning: Although there isn't any flash photography in the pictures ahead, there is some potentially eye-searing orange shag carpeting. You may wish to change the color setting on your monitor, but then again you might not, because those settings will never go back to normal despite hours and even days of fiddling. Trust me on this one. A better solution might be to put on a pair of dark sunglasses. Ignore anyone who laughs at you for surfing the net with cool shades on.

Here's the garment all laid out on the floor, ready for the next step:


There are all kinds of ways to seam knitting together. The most invisible is mattress stitch, which is used to join two vertical rows together:


Mattress stitch takes a little work to get the hang of, but it's well worth all the effort. It's very gratifying to pull the seaming thread tight and watch the stitches zip themselves together.

But then I hit a snag - I had to seam two horizontal rows together. See how the little v's of the knitting are lying on their sides in exhaustion, rather than standing up straight? That's the first clue that trouble lies ahead:


The Mary Maxim pattern didn't offer any suggestions here, because they were trying to cram the whole pattern onto one sheet of paper, and there was no room for extraneous material...except for those images of basic crochet stitches, that is. Left on my own hook, I did what I always do, and turned to the Internet for help.

I found a simple tutorial on shoulder seaming at TLC knitting, so I tried that first. I wasn't happy, though, because it left a little runnel or valley in the finished side. So I took that out and tried a slip stitch crochet edge, which also didn't work out. Eventually I settled on a 'single crochet' seam, and I'm reasonably happy with how it looks. It blends in well with the crochet edging that  is going on the edges of the garment, and as a bonus provides nice folding lines.


I did a little more research, though, and found what I think might be a better solution for anyone else who might be working on this kit  - backstitch seaming. There's a good tutorial with tips at Dummies.com. I have already started the edging and don't feel like frogging it at this point, otherwise I would give this kind of seam a try.

Now, all of this might seem (pun intended) really obvious to more experienced knitters, but I personally would have appreciated a little more guidance in the written instructions than "seam the edges neatly together". And speaking of guidance, for a wonderful page devoted completely to seaming knits, check out VogueKnitting. This link is definitely going into my bookmarks folder.

I'm off to finish the crochet edging to the kimono. Yay! Nearly done!
Related Posts Plugin for WordPress, Blogger...